Introduction
With a high-level plan sketched out and a power detecting Raspberry Pi at my disposal it was time to stay up late and start tapping!
As someone who’s trying to reposition themselves as a ‘backend developer’, I knew I wanted to become familiar with Amazon Web Services (AWS). It might not be the answer to every solution, but it certainly felt like something that should be in my toolkit.
Also, coming from an embedded background, I wasn’t fussed about making a bells-and-whistles device. I was in this for the cloud architecture lessons, so I wanted to get this end of the project done quickly and simply.
AWS IoT
AWS IoT is a PaaS offering for getting connected ‘things’ talking to the cloud (specifically, Amazon’s cloud) using the ubiquitous MQTT protocol.
I had initally thought might try out RabbitMQ and the more secure, and feature-rich AMQP , protocol, but this seemed too handy to turn down. Leave some lessons for the future, eh?
AWS IoT plugs some of the deficiencies of MQTT, such as authentication and encryption using certificates and HTTPS which was perfect for me to quickly dabble in a complete networking project.
…Python 🤦♀️
Now, don’t get me wrong. Python has its uses. But I’ve tried playing with Pi’s, Docker, and Python
before, and the whole ARMv7 architecture thing was a real nightmare. Life isn’t as simple as pip install
when you watch your tiny Pi trying to compile numpy from source1.
Sadly the AWS IoT Device SDK only came in Embedded C, Java, Javascript, and Python flavours. For me and my homebrew hack project, Python was the only answer.
Source
I kicked off the source as always do, using my cookiecutter template to generate a python package with linting, testing, and dependency management ready-to-go.
Next I found a tutorial on getting a Rasperry Pi, running BalenaOS sending messages to AWS IoT. Which by-and-large went to plan. I smugly handled the parsing of the certificates from environment variables using my config class pattern.
This got me with the equivalent of a ‘hello world’ IoT device, I could send MQTT messages to AWS IoT and see them arrive. Now to actually move to my solution.
Device shadow
I knew I wanted to:
- Associate one or more device with a single user account
- Post power status updates to the cloud
- Send the account owner an email when the power status had changed
- Have some method of ‘checking’ the most recent status
The emphasised parts stood out to me as application ‘state’. And when I hear ‘state’ and I think database. I ended up implementing something like this:
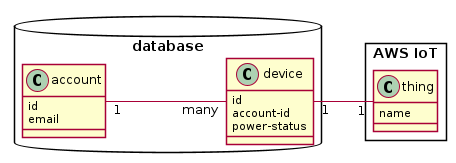
However it proved to be a pain maintaining an association between an AWS IoT ‘thing’ and its corresponding
device database entry. I made the ‘thing’ name the same as the device’s id but that made creating
new devices a bit of dance. Anyway, when you think about it, AWS maintatining a ‘thing’ for me really
is a database entry of sorts. It all felt a bit redundant.
Enter the AWS IoT Device Shadow Service . This service is designed for ‘telemetry’ applications like mine - you have a device that reports its state to the cloud for other services to use.
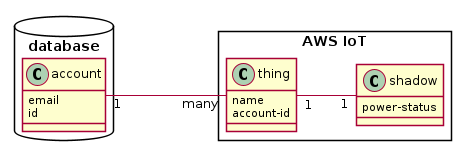
AWS IoT maintains the correspondence between a ‘thing’ and its shadow for me, relieving me of the issue
I’d faced. The shadow is designed to cache the device’s reported state (power-status) along with the
time it was updated.
The correspondence between an account and its many devices could have been a blocker, but AWS IoT allows
you to store ‘attributes’ on a thing, which I used to store the associated account-id
Implementation
I created a client class for connecting to the device shadow:
import logging

from AWSIoTPythonSDK.MQTTLib import AWSIoTMQTTShadowClient

_LOGGER = logging.getLogger(__file__)
logging.getLogger("AWSIoTPythonSDK").setLevel(logging.WARNING)


class CloudClient:
    """Client for interfacing with the cloud"""
    _QOS = 1
    _DISCONNECT_TIMEOUT = 10
    _OPERATION_TIMEOUT = 5

    def __init__(self, config: ClientConfig) -> None:
        self.config = config
        # Unique ID. If another connection using the same key is opened the
        # previous one is auto closed by AWS IOT
        self.client = AWSIoTMQTTShadowClient(config.device_id)
        # Used to configure the host name and port number the underneath AWS
        # IoT MQTT Client tries to connect to.
        self.client.configureEndpoint(self.config.endpoint, self.config.port)
        # Used to configure the rootCA, private key and certificate files.
        # configureCredentials(CAFilePath, KeyPath='', CertificatePath='')
        self.client.configureCredentials(str(self.config.root_cert.resolve()),
                                         str(self.config.thing_key.resolve()),
                                         str(self.config.thing_cert.resolve()))
        # Configure connect/disconnect timeout to be 10 seconds
        self.client.configureConnectDisconnectTimeout(self._DISCONNECT_TIMEOUT)
        # Configure MQTT operation timeout to be 5 seconds
        self.client.configureMQTTOperationTimeout(self._OPERATION_TIMEOUT)
        # Create the shadow handler
        self.shadow = self.client.createShadowHandlerWithName(
            config.device_id, False)
Then it was just a case of creating a method for sending an update. Note that the DeviceShadowState
class used here was a simple helper I wrote to convert my boolean status into JSON:
class CloudClient:
    ...
    def power_status_changed(self, status: bool) -> None:
        """Send a messaging indicating the power status has updated

        Args:
            status (bool): New power status
        """
        payload = DeviceShadowState(status=status).to_json()
        _LOGGER.info('Publishing status update: %s', payload)
        token = self.shadow.shadowUpdate(payload, self.shadow_update_handler,
                                         self._OPERATION_TIMEOUT)
        _LOGGER.debug("Status update returned token: %s", token)

    @staticmethod
    def shadow_update_handler(payload: str, response_status: str,
                              token: str) -> None:
        """Handle a device shadow update response

        Args:
            payload (str): Response body
            response_status (str): Response status
            token (str): Request identifier

        Raises:
            RuntimeError: Unexpected response
        """
        del token
        if response_status == 'accepted':
            _LOGGER.info("Shadow update accepted: payload=%s", payload)
        elif response_status in ['timeout', 'rejected']:
            _LOGGER.error("Shadow update failed: status=%s, payload=%s",
                          response_status, payload)
        else:
            raise RuntimeError(
                f"Unexpected response_status: {response_status}")
You can see the full module in the GitHub repository .
Conclusion
I’ve skipped over some detail here, for example my rationle for using docker and BalenaOS for deploying my application. I’ll be putting out a blog post soon to cover that!
The message of this blog post is that I now have a device that reports its state into AWS. I could now get to work making the magic happen on the world wide web.